Photoshop:制作血渍字体
要点:Photoshop,制作血渍字体
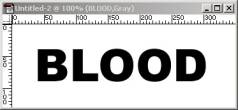
1.建立一个新文件,宽度350 pixels,高度为130pixels。分辨率72pixel/cm,模式为RGBColor,背景为白色。输入文字,这里使用的是Arial Black字体,大小是36磅。
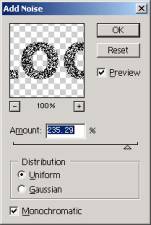
2.点击Layer/Rasterize/Type,栅格化文字。使用Filter/Noise/Add Noise为文字增加杂点。设置如图:
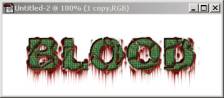
阴森恐怖的血渍字体,是不是会给你有一种吸血鬼出现的感觉?那么这种恐怖的效果是如何做出来的?来跟我的教程一步一步学做吧。
阴森恐怖的血渍字体,是不是会给你有一种吸血鬼出现的感觉?那么这种恐怖的效果是如何做出来的?来跟我的教程一步一步学做吧。
1.建立一个新文件,宽度350 pixels,高度为130pixels。分辨率72pixel/cm,模式为RGBColor,背景为白色。输入文字,这里使用的是Arial Black字体,大小是36磅。
2.点击Layer/Rasterize/Type,栅格化文字。使用Filter/Noise/Add Noise为文字增加杂点。设置如图:
推荐继续学习,上一篇ps教程:Photoshop:色彩的基础 下一篇ps教程:Photoshop:创意设计手法14点
学习更多ps教程