Photoshop打造可爱的塑料文字
要点:塑料文字
制作工具:Photoshop CS
制作过程:
1、新建宽度为18厘米,高度为5.5厘米,分辨率为150像素,颜色模式为RGB,背景为白色的文件。
2、设置前景色为深褐色。选择“文字工具”,设置字体为“汉仪黑咪体简”,在画面中输入如图01所示的字母。

图01
3、选择菜单栏中的“图层”“图层样式”“渐变叠加”命令,弹出“图层样式”对话框,参数设置如图02所示,画面效果如图03所示。
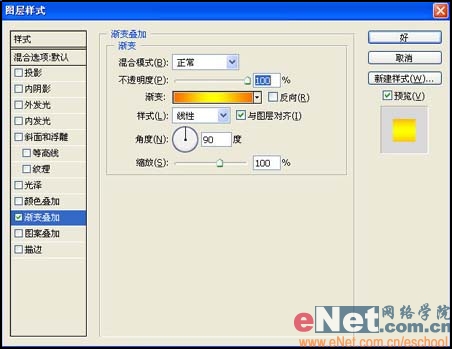
图02

图03
4、双击“图层”面板中的“文字”层,弹出“图层样式”对话框,勾选“投影”选项,然后设置各项参数如图04所示,画面效果如图05。
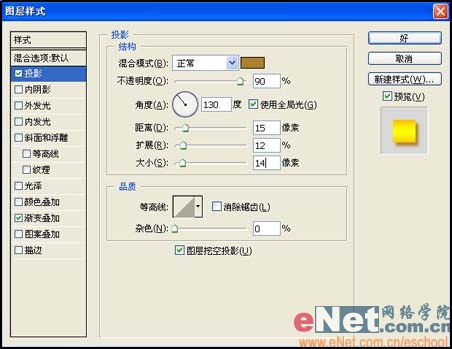
图04

图05
5、打开“图层样式”对话框,勾选“内阴影”和“外发光”选项,设置参数如图06、07所示,效果如图08。
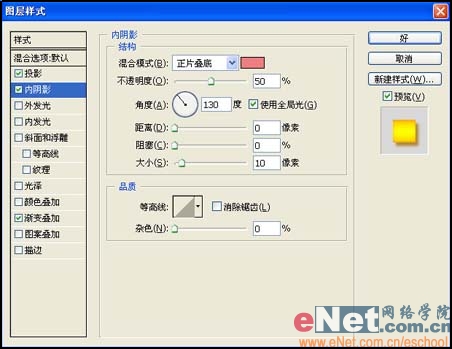
图06
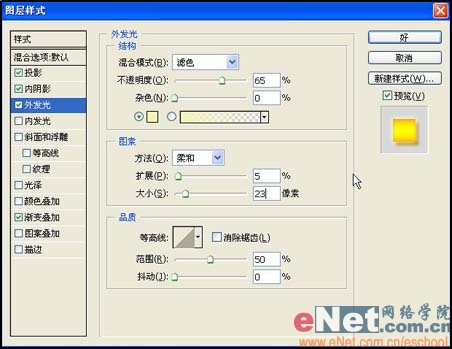
图07

图08
6、打开“图层样式”对话框,勾选“内发光”和“斜面和浮雕”选项,设置参数如图09、10所示,效果如图11。
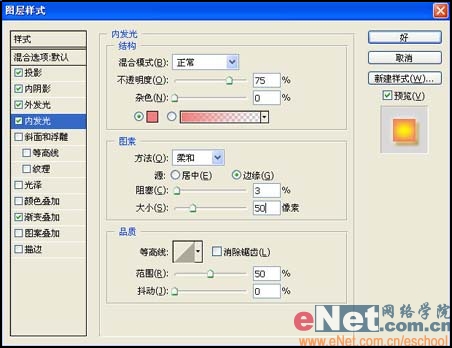
图09
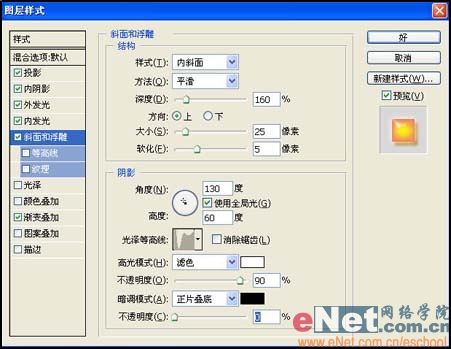
图10

图11
7、按住“Ctrl”键,单击文字层,为其添加选区,如图12。

图12
8、选择菜单栏中的“选择”“修改”“收缩”命令,弹出“收缩选区”对话框,设置收缩量为21像素。
9、选择工具箱中的“矩形选框工具”按钮,将鼠标光标移动到选区内,按住左键拖拽鼠标向左移动选区,如图13所示。

图13
10、新建图层1,填充白色,取消选区,画面效果如图14所示。

图14
11、选择菜单栏中的“滤镜”“模糊”“高斯模糊”命令,弹出“高斯模糊”对话框,设置半径为5像素。
12、将图层1的“不透明度”设置为30%,至此最终效果如图15所示,调整“渐变叠加”的渐变色,可以制作出不同颜色的透明塑料字。

图15
制作工具:Photoshop CS
制作过程:
1、新建宽度为18厘米,高度为5.5厘米,分辨率为150像素,颜色模式为RGB,背景为白色的文件。
2、设置前景色为深褐色。选择“文字工具”,设置字体为“汉仪黑咪体简”,在画面中输入如图01所示的字母。
图01
3、选择菜单栏中的“图层”“图层样式”“渐变叠加”命令,弹出“图层样式”对话框,参数设置如图02所示,画面效果如图03所示。
图02
图03
4、双击“图层”面板中的“文字”层,弹出“图层样式”对话框,勾选“投影”选项,然后设置各项参数如图04所示,画面效果如图05。
图04
图05
5、打开“图层样式”对话框,勾选“内阴影”和“外发光”选项,设置参数如图06、07所示,效果如图08。
图06
图07
图08
6、打开“图层样式”对话框,勾选“内发光”和“斜面和浮雕”选项,设置参数如图09、10所示,效果如图11。
图09
图10
图11
7、按住“Ctrl”键,单击文字层,为其添加选区,如图12。
图12
8、选择菜单栏中的“选择”“修改”“收缩”命令,弹出“收缩选区”对话框,设置收缩量为21像素。
9、选择工具箱中的“矩形选框工具”按钮,将鼠标光标移动到选区内,按住左键拖拽鼠标向左移动选区,如图13所示。
图13
10、新建图层1,填充白色,取消选区,画面效果如图14所示。
图14
11、选择菜单栏中的“滤镜”“模糊”“高斯模糊”命令,弹出“高斯模糊”对话框,设置半径为5像素。
12、将图层1的“不透明度”设置为30%,至此最终效果如图15所示,调整“渐变叠加”的渐变色,可以制作出不同颜色的透明塑料字。
图15
推荐继续学习,上一篇ps教程:用photoshop制作超豪华的手表 下一篇ps教程:岁月如水:用Photoshop打造年轮
学习更多ps教程