用Photoshop教你打造蛇皮文字效果
要点:打造蛇皮文字效果
制作工具:Photoshop CS
制作过程
1、新建宽度为16厘米,高度为8厘米,分辨率为200像素,颜色模式为RGB,背景内容为白色的文件。
2、将前景色设置为黑色,选择工具箱中的“文字”工具,在画面中输入如图01所示的英文字母。

图01
3、选取菜单栏中的“图层”“栅格化”“文字”命令,将文字层转换为普通层,然后按住“Ctrl”键,单击“图层”面板中的文字层,为其添加选区。
4、选取菜单栏中的“选择”“羽化”命令,在弹出的“羽化选区”对话框中,将“羽化半径”参数设置为1像素,然后单击好。
5、按“Shift+Ctrl+I”键,将添加的选区反选,然后连续两次按“Delete”键,删除选区中的文字边缘内容,使文字的边缘更加圆滑。
6、按“Ctrl+D”取消选区,然后将工具箱中的前景色设置为绿色C:65,Y:100,新建图层1,按住“Ctrl”键单击“文字”层,为其添加选择区域,然后为图层1选区填充绿色,效果如图02所示。

图02
7、选取菜单栏中的“滤镜”“纹理”“颗粒”命令,弹出“颗粒”对话框,设置强度为20,对比度为40,颗粒类型为柔和,单击好,效果如图03所示。

图03
8、选取菜单栏中的“滤镜”“艺术效果”“干画笔”命令,弹出“干画笔”对话框,设置画笔大小为2,画笔细节为8,纹理为3,单击好,效果如图04所示。

图04
9、选取菜单栏中的“滤镜”“扭曲”“波浪”命令,弹出“波浪”对话框,各选项及参数设置如图05所示,画面效果如图06所示。波浪效果是随机产生的,可以通过多次单击“波浪”对话框中的“随机化”按钮,得到满意的图案效果。
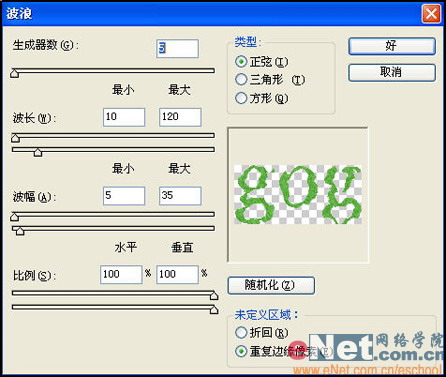
图05

图06
10、将文字层隐藏,隐藏“文字层”后的文字效果如图07所示,将前景色设置为绿色C:64,Y:100,背景色设置为蓝色C:60,Y:32。
11、选取菜单栏中的“滤镜”“艺术效果”“水彩”命令,弹出“水彩”对话框,设置画笔细节为8,暗调强度为1,纹理为1,单击好,效果如图08所示。
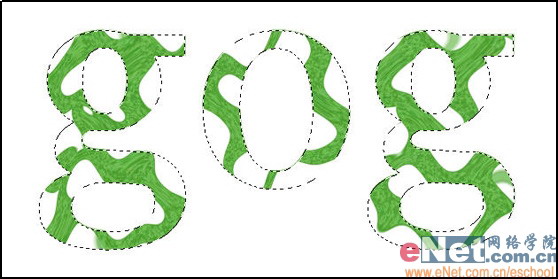
图07
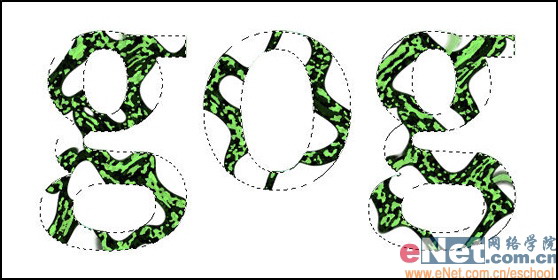
图08
12、打开“通道”面板,将文字选区存储为“Alpha 1”通道,然后点选“Alpha 1”通道,此时的通道显示画面效果如图09所示。

图09
13、选取菜单栏中的“滤镜”“模糊”“高斯模糊”命令,弹出“高斯模糊”对话框,设置半径为16,然后单击好。连续按5次“Alt+Ctrl+F”键,重复执行“高斯模糊”命令,并将“半径”的参数分别设置为“13”、“10”、“7”、“4”、“1”像素,单击好。
14、按“Ctrl+D”取消选区,然后在重复执行一次“高斯模糊”命令,并将“半径”参数设置为2像素,文字效果如图10所示。

图10
15、按“Ctrl+~”键返回到RGB模式,将“图层1”设置为当前层。选取菜单栏中的“滤镜”“渲染”“光照效果”命令,弹出“光照效果”对话框,参数设置如图11所示,单击好。
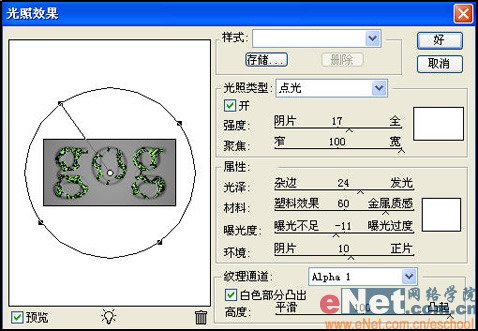
图11
16、在重复一次“光照效果”命令,设置参数如图12所示,效果如图13所示。
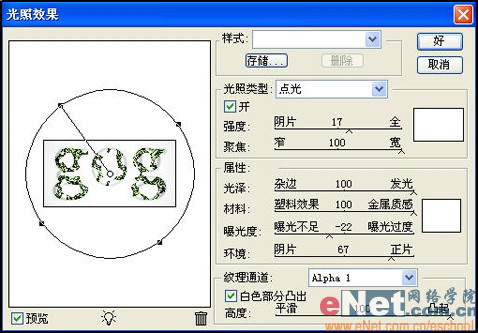
图12
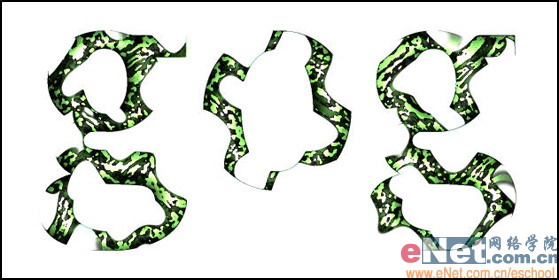
图13
17、按“Ctrl+U”键,弹出“色相/饱和度“对话框,设置参数如图14所示,效果如图15所示。
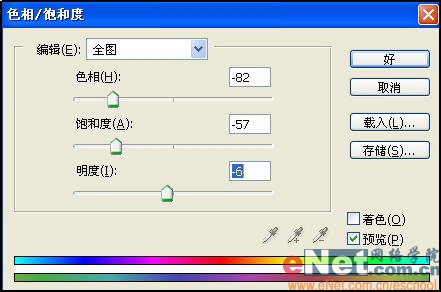
图14
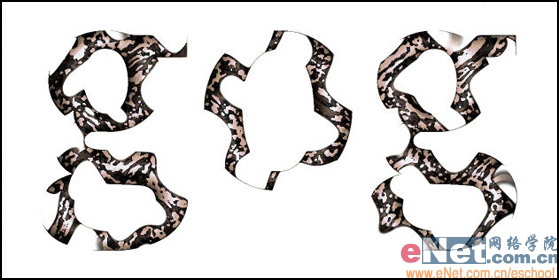
图15
18、选取菜单栏中的“图层”“图层样式”“混合选项”命令,弹出“图层样式”对话框,设置各项及参数如图16-18所示。添加图层样式后的文字效果如图19所示。

图16
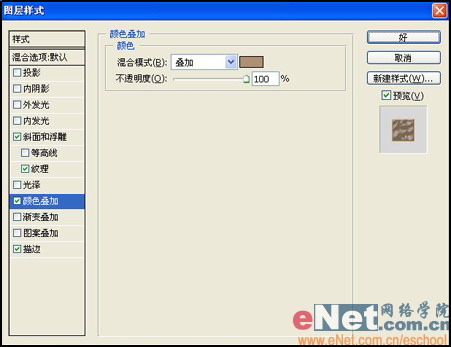
图17
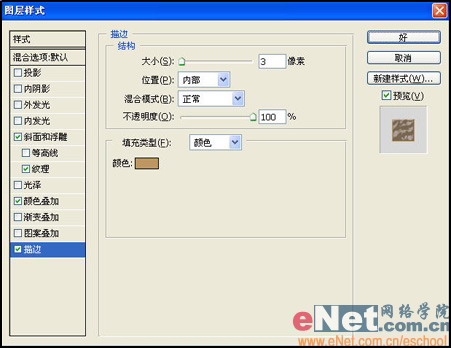
图18
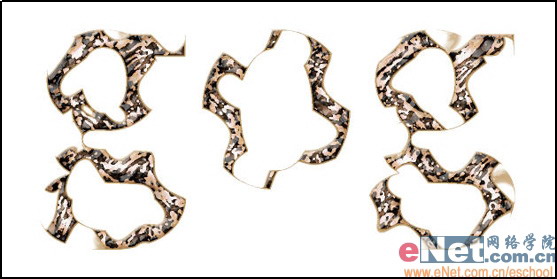
图19
19、新建“图层2”,并将其调整至“图层1”的下方,在按住“Ctrl”键,单击“图层”面板中的“文字”层,为其添加选区,然后为“图层2”填充黑色。
20、取消选区,然后将工具箱中的前景色设置为黄灰色C:25,M:38,Y:70,K:2。选取菜单栏中的“滤镜”“纹理”“染色玻璃”命令,弹出“染色玻璃”对话框,设置单元格大小为3,边框粗细为2,光照强度为1,效果如图20所示。

图20
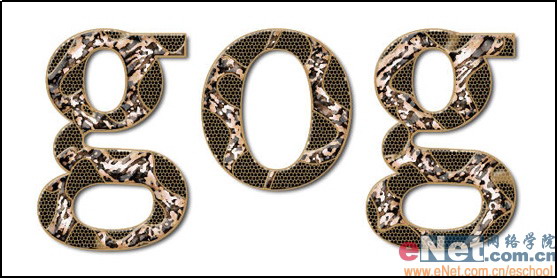
21、选取菜单栏中的“图层”“图层样式”“混合选项”命令,弹出“图层样式”对话框,设置各项及参数如图21-23所示。添加图层样式后的文字效果如图24所示。
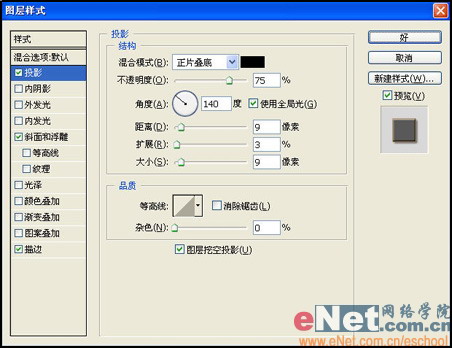
图21
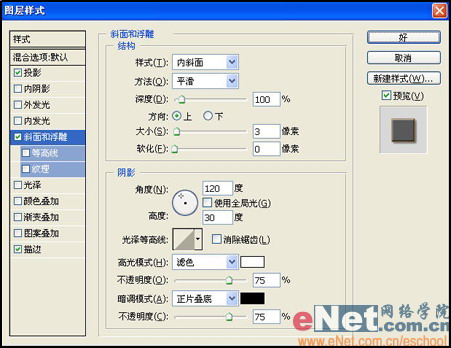
图22
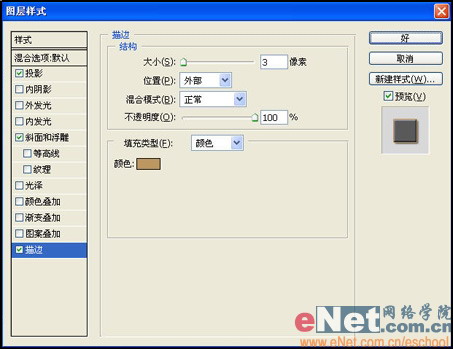
图23
制作工具:Photoshop CS
制作过程
1、新建宽度为16厘米,高度为8厘米,分辨率为200像素,颜色模式为RGB,背景内容为白色的文件。
2、将前景色设置为黑色,选择工具箱中的“文字”工具,在画面中输入如图01所示的英文字母。
图01
3、选取菜单栏中的“图层”“栅格化”“文字”命令,将文字层转换为普通层,然后按住“Ctrl”键,单击“图层”面板中的文字层,为其添加选区。
4、选取菜单栏中的“选择”“羽化”命令,在弹出的“羽化选区”对话框中,将“羽化半径”参数设置为1像素,然后单击好。
5、按“Shift+Ctrl+I”键,将添加的选区反选,然后连续两次按“Delete”键,删除选区中的文字边缘内容,使文字的边缘更加圆滑。
6、按“Ctrl+D”取消选区,然后将工具箱中的前景色设置为绿色C:65,Y:100,新建图层1,按住“Ctrl”键单击“文字”层,为其添加选择区域,然后为图层1选区填充绿色,效果如图02所示。
图02
7、选取菜单栏中的“滤镜”“纹理”“颗粒”命令,弹出“颗粒”对话框,设置强度为20,对比度为40,颗粒类型为柔和,单击好,效果如图03所示。
图03
8、选取菜单栏中的“滤镜”“艺术效果”“干画笔”命令,弹出“干画笔”对话框,设置画笔大小为2,画笔细节为8,纹理为3,单击好,效果如图04所示。
图04
9、选取菜单栏中的“滤镜”“扭曲”“波浪”命令,弹出“波浪”对话框,各选项及参数设置如图05所示,画面效果如图06所示。波浪效果是随机产生的,可以通过多次单击“波浪”对话框中的“随机化”按钮,得到满意的图案效果。
图05
图06
10、将文字层隐藏,隐藏“文字层”后的文字效果如图07所示,将前景色设置为绿色C:64,Y:100,背景色设置为蓝色C:60,Y:32。
11、选取菜单栏中的“滤镜”“艺术效果”“水彩”命令,弹出“水彩”对话框,设置画笔细节为8,暗调强度为1,纹理为1,单击好,效果如图08所示。
图07
图08
12、打开“通道”面板,将文字选区存储为“Alpha 1”通道,然后点选“Alpha 1”通道,此时的通道显示画面效果如图09所示。
图09
13、选取菜单栏中的“滤镜”“模糊”“高斯模糊”命令,弹出“高斯模糊”对话框,设置半径为16,然后单击好。连续按5次“Alt+Ctrl+F”键,重复执行“高斯模糊”命令,并将“半径”的参数分别设置为“13”、“10”、“7”、“4”、“1”像素,单击好。
14、按“Ctrl+D”取消选区,然后在重复执行一次“高斯模糊”命令,并将“半径”参数设置为2像素,文字效果如图10所示。
图10
15、按“Ctrl+~”键返回到RGB模式,将“图层1”设置为当前层。选取菜单栏中的“滤镜”“渲染”“光照效果”命令,弹出“光照效果”对话框,参数设置如图11所示,单击好。
图11
16、在重复一次“光照效果”命令,设置参数如图12所示,效果如图13所示。
图12
图13
17、按“Ctrl+U”键,弹出“色相/饱和度“对话框,设置参数如图14所示,效果如图15所示。
图14
图15
18、选取菜单栏中的“图层”“图层样式”“混合选项”命令,弹出“图层样式”对话框,设置各项及参数如图16-18所示。添加图层样式后的文字效果如图19所示。
图16
图17
图18
图19
19、新建“图层2”,并将其调整至“图层1”的下方,在按住“Ctrl”键,单击“图层”面板中的“文字”层,为其添加选区,然后为“图层2”填充黑色。
20、取消选区,然后将工具箱中的前景色设置为黄灰色C:25,M:38,Y:70,K:2。选取菜单栏中的“滤镜”“纹理”“染色玻璃”命令,弹出“染色玻璃”对话框,设置单元格大小为3,边框粗细为2,光照强度为1,效果如图20所示。
图20
21、选取菜单栏中的“图层”“图层样式”“混合选项”命令,弹出“图层样式”对话框,设置各项及参数如图21-23所示。添加图层样式后的文字效果如图24所示。
图21
图22
图23
推荐继续学习,上一篇ps教程:Photoshop打造前卫时尚美女装饰画 下一篇ps教程:Photoshop教你鼠绘超酷忍者神龟
学习更多ps教程